User’s guide
如果你接触过Web开发,你可能对接下来描述的PyWebIO的用法感到不太习惯,不同于传统Web开发的后端实现接口、前端进行展示交互的模式,在PyWebIO中,所有的逻辑都通过编写Python代码实现。
你可以按照编写控制台程序的逻辑编写PyWebIO应用,只不过这里的终端变成了浏览器。通过PyWebIO提供的命令式API,你可以简单地调用 put_text() 、 put_image() 、 put_table() 等函数输出文本、图片、表格等内容到浏览器,也可以调用 input() 、 select() 、 file_upload() 等函数在浏览器上显示不同表单来接收用户的输入。此外PyWebIO中还提供了点击事件、布局等支持,让你可以使用最少的代码完成与用户的交互,并尽可能提供良好的用户体验。
This user guide introduces you the most of the features of PyWebIO. There is a demo link at the top right of the example codes in this document, where you can run the example code online and see what happens. Also, the PyWebIO Playground is a good place to write, run and share your PyWebIO code online.
输入
输入函数都定义在 pywebio.input 模块中,可以使用 from pywebio.input import * 引入。
调用输入函数会在浏览器上弹出一个输入表单来获取输入。PyWebIO的输入函数是阻塞式的(和Python内置的 input 一样),在表单被成功提交之前,输入函数不会返回。
基本输入
首先是一些基本类型的输入。
文本输入:
age = input("How old are you?", type=NUMBER)
这样一行代码的效果为:浏览器会弹出一个文本输入框来获取输入,在用户完成输入将表单提交后,函数返回用户输入的值。
下面是一些其他类型的输入函数:
# Password input
password = input("Input password", type=PASSWORD)

# Drop-down selection
gift = select('Which gift you want?', ['keyboard', 'ipad'])

# Checkbox
agree = checkbox("User Term", options=['I agree to terms and conditions'])

# Single choice
answer = radio("Choose one", options=['A', 'B', 'C', 'D'])

# Multi-line text input
text = textarea('Text Area', rows=3, placeholder='Some text')

# File Upload
img = file_upload("Select a image:", accept="image/*")
输入选项
输入函数可指定的参数非常丰富(全部参数及含义请见 函数文档 ):
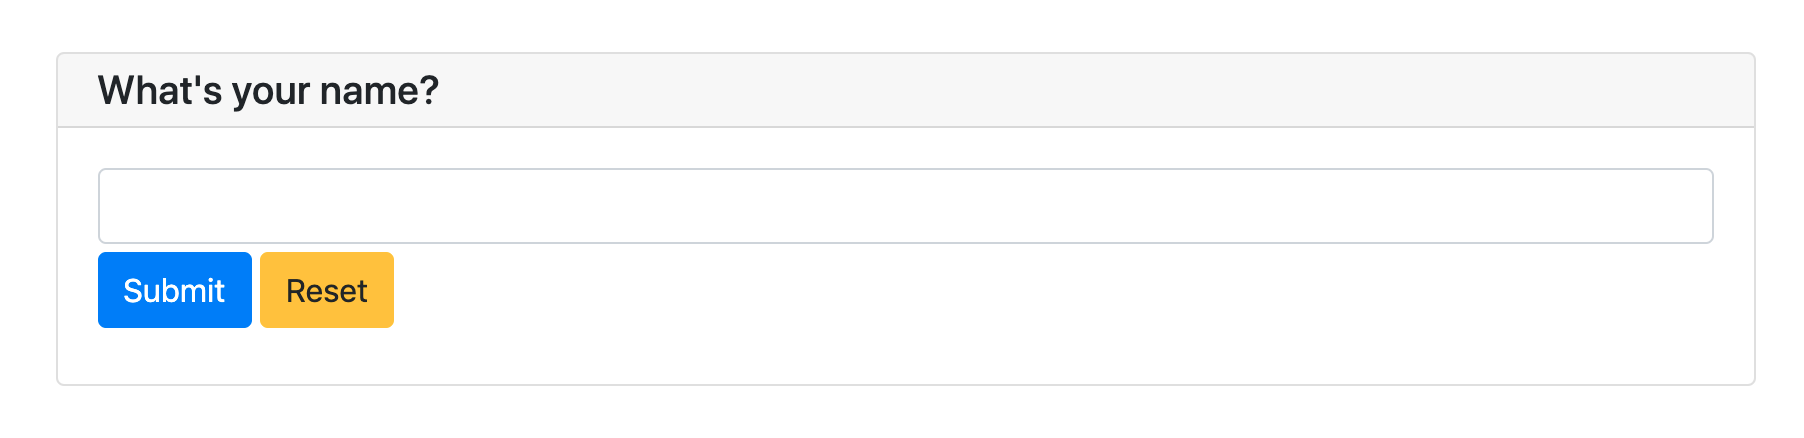
input('This is label', type=TEXT, placeholder='This is placeholder',
        help_text='This is help text', required=True)
以上代码将在浏览器上显示如下:
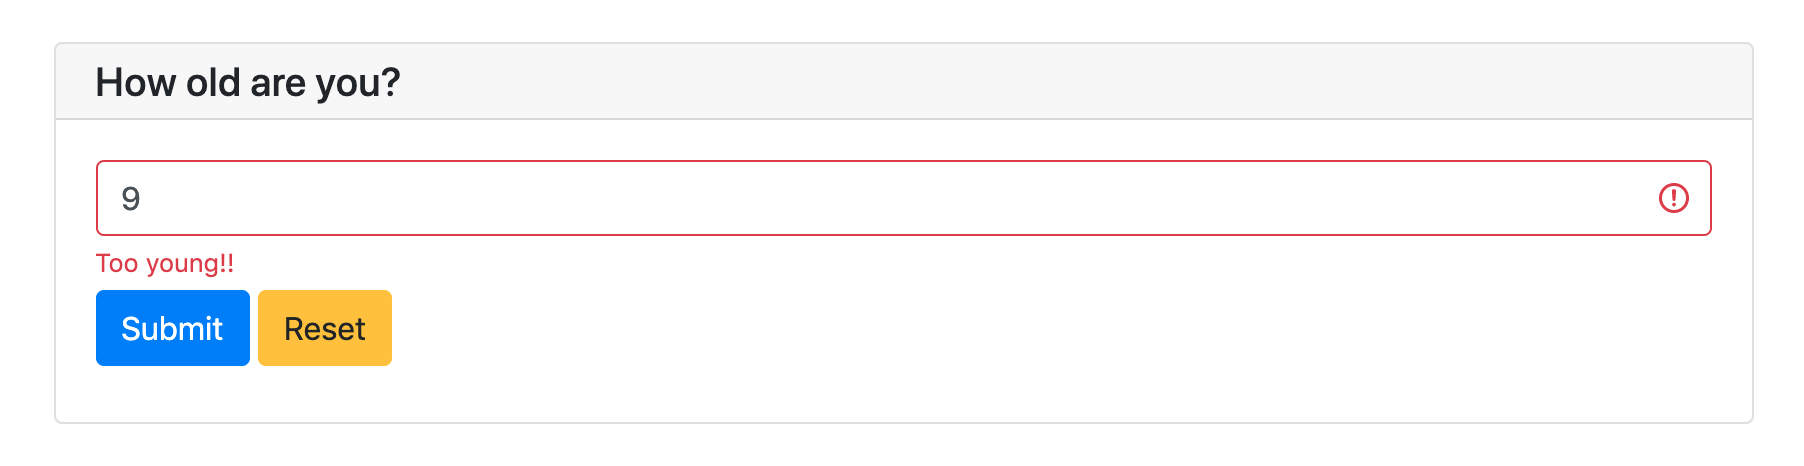
我们可以为输入指定校验函数,校验函数应在校验通过时返回None,否则返回错误消息:
def check_age(p):  # return None when the check passes, otherwise return the error message
    if p < 10:
        return 'Too young!!'
    if p > 60:
        return 'Too old!!'

age = input("How old are you?", type=NUMBER, validate=check_age)
当用户输入了不合法的值时,页面上的显示如下:
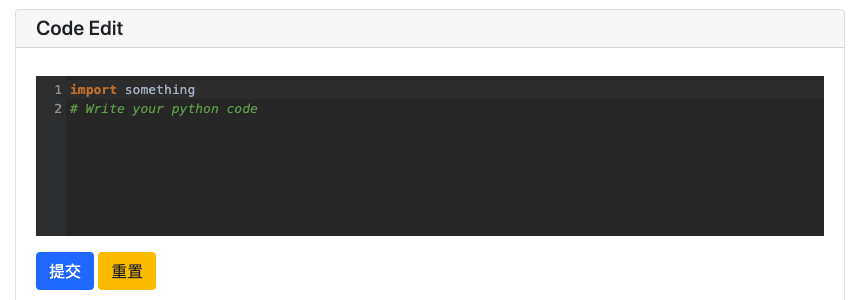
pywebio.input.textarea() 中可以使用 code 参数来开启代码风格的编辑区。
code = textarea('Code Edit', code={
    'mode': "python",
    'theme': 'darcula',
}, value='import something\n# Write your python code')
以上代码将在浏览器上显示如下:
输入组
PyWebIO支持输入组, 返回结果为一个字典。pywebio.input.input_group() 接受单项输入组成的列表作为参数, 返回以单项输入中的 name 作为键、以输入数据为值的字典:
data = input_group("Basic info",[
  input('Input your name', name='name'),
  input('Input your age', name='age', type=NUMBER, validate=check_age)
])
put_text(data['name'], data['age'])
输入组中同样支持使用 validate 参数设置校验函数,其接受整个表单数据作为参数:
def check_form(data):  # return (input name, error msg) when validation fail
    if len(data['name']) > 6:
        return ('name', 'Name too long!')
    if data['age'] <= 0:
        return ('age', 'Age can not be negative!')
注意
PyWebIO 根据是否在输入函数中传入 name 参数来判断输入函数是在 input_group() 中还是被单独调用。所以当单独调用一个输入函数时, 不要 设置 name 参数;而在 input_group() 中调用输入函数时,需 务必提供 name 参数。
输出
输出函数都定义在 pywebio.output 模块中,可以使用 from pywebio.output import * 引入。
调用输出函数后,内容会实时输出到浏览器,在应用的生命周期内,可以在任意时刻调用输出函数。
基本输出
PyWebIO提供了一系列函数来输出文本、表格、图像等格式:
# Text Output
put_text("Hello world!")

# Table Output
put_table([
    ['Commodity', 'Price'],
    ['Apple', '5.5'],
    ['Banana', '7'],
])

# Image Output
put_image(open('/path/to/some/image.png', 'rb').read())  # local image
put_image('http://example.com/some-image.png')  # internet image

# Markdown Output
put_markdown('~~Strikethrough~~')

# File Output
put_file('hello_word.txt', b'hello word!')

# Show a PopUp
popup('popup title', 'popup text content')

# Show a notification message
toast('New message 🔔')
PyWebIO提供的全部输出函数见 pywebio.output 模块。另外,PyWebIO还支持一些第三方库来进行数据可视化,参见 第三方库生态 。
备注
如果你在Python shell, IPython 或 jupyter notebook这种交互式执行环境中使用PyWebIO,你需要显式调用 show() 方法来显示输出:
>>> put_text("Hello world!").show()
>>> put_table([
...     ['A', 'B'],
...     [put_markdown(...), put_text('C')]
... ]).show()
组合输出
函数名以 put_ 开始的输出函数,可以与一些输出函数组合使用,作为最终输出的一部分:
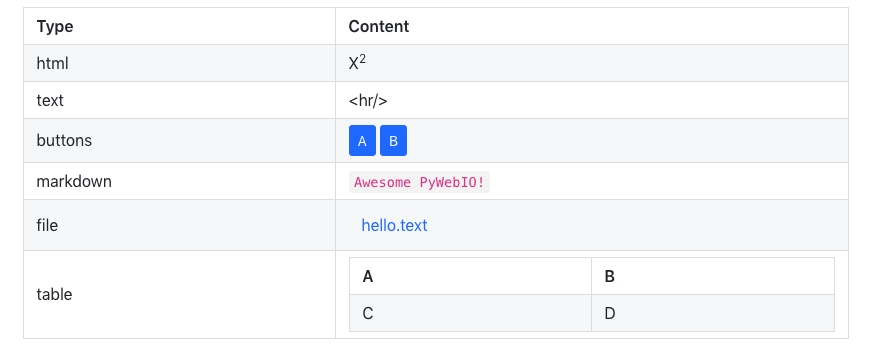
put_table() 支持以 put_xxx() 调用作为单元格内容:
put_table([
    ['Type', 'Content'],
    ['html', put_html('X<sup>2</sup>')],
    ['text', '<hr/>'],  # equal to ['text', put_text('<hr/>')]
    ['buttons', put_buttons(['A', 'B'], onclick=...)],
    ['markdown', put_markdown('`Awesome PyWebIO!`')],
    ['file', put_file('hello.text', b'hello world')],
    ['table', put_table([['A', 'B'], ['C', 'D']])]
])
以上代码将在浏览器上显示如下:
类似地, popup() 也可以将 put_xxx() 调用作为弹窗内容:
popup('Popup title', [
    put_html('<h3>Popup Content</h3>'),
    'plain html: <br/>',  # Equivalent to: put_text('plain html: <br/>')
    put_table([['A', 'B'], ['C', 'D']]),
    put_button('close_popup()', onclick=close_popup)
])
另外,你可以使用 put_widget() 来创建可以接受 put_xxx() 的自定义输出控件。
接受 put_xxx() 调用作为参数的完整输出函数清单请见 输出函数列表
上下文管理器
一些接受 put_xxx() 调用作为参数的输出函数支持作为上下文管理器来使用:
with put_collapse('This is title'):
    for i in range(4):
        put_text(i)

    put_table([
        ['Commodity', 'Price'],
        ['Apple', '5.5'],
        ['Banana', '7'],
    ])
支持上下文管理器的完整函数清单请见 输出函数列表
事件回调
从上面可以看出,PyWebIO把交互分成了输入和输出两部分:输入函数为阻塞式调用,会在用户浏览器上显示一个表单,在用户提交表单之前输入函数将不会返回;输出函数将内容实时输出至浏览器。这种交互方式和控制台程序是一致的,因此PyWebIO应用非常适合使用控制台程序的编写逻辑来进行开发。
此外,PyWebIO还支持事件回调:PyWebIO允许你输出一些控件并绑定回调函数,当控件被点击时相应的回调函数便会被执行。
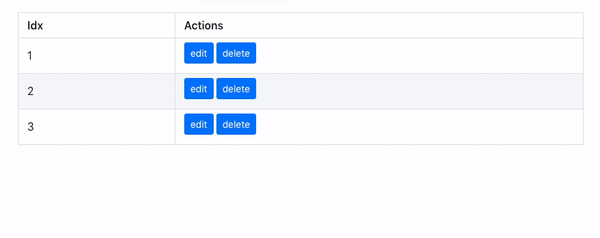
下面是一个例子:
from functools import partial

def edit_row(choice, row):
    put_text("You click %s button ar row %s" % (choice, row))

put_table([
    ['Idx', 'Actions'],
    [1, put_buttons(['edit', 'delete'], onclick=partial(edit_row, row=1))],
    [2, put_buttons(['edit', 'delete'], onclick=partial(edit_row, row=2))],
    [3, put_buttons(['edit', 'delete'], onclick=partial(edit_row, row=3))],
])
put_table() 的调用不会阻塞。当用户点击了某行中的按钮时,PyWebIO会自动调用相应的回调函数:
当然,PyWebIO还支持单独的按钮控件:
def btn_click(btn_val):
    put_text("You click %s button" % btn_val)

put_buttons(['A', 'B', 'C'], onclick=btn_click)  # a group of buttons

put_button("Click me", onclick=lambda: toast("Clicked"))  # single button
事实上,不仅是按钮,所有的输出都可以绑定点击事件。你可以在输出函数之后调用 onclick() 方法来绑定点击事件:
put_image('some-image.png').onclick(lambda: toast('You click an image'))

# set onclick in combined output
put_table([
    ['Commodity', 'Price'],
    ['Apple', put_text('5.5').onclick(lambda: toast('You click the text'))],
])
onclick() 方法的返回值为对象本身,所以可以继续用于组合输出中。
输出域Scope
PyWebIO使用scope模型来控制内容输出的位置。scope为输出内容的容器,你可以创建一个scope并将内容输出到其中。
每个输出函数(函数名形如 put_xxx() )都会将内容输出到一个Scope,默认为”当前Scope”,”当前Scope”由 use_scope() 设置。
use_scope()
可以使用 use_scope() 开启并进入一个新的输出域,或进入一个已经存在的输出域:
with use_scope('scope1'):  # 创建并进入scope 'scope1'
    put_text('text1 in scope1')  # 输出内容到 scope1

put_text('text in parent scope of scope1')  # 输出内容到 ROOT scope

with use_scope('scope1'):  # 进入之前创建的scope 'scope1'
    put_text('text2 in scope1')  # 输出内容到 scope1
以上代码将会输出:
text1 in scope1
text2 in scope1
text in parent scope of scope1
use_scope() 还可以使用 clear 参数将scope中原有的内容清空:
with use_scope('scope2'):
    put_text('create scope2')

put_text('text in parent scope of scope2')

with use_scope('scope2', clear=True):  # enter the existing scope and clear the previous content
    put_text('text in scope2')
以上代码将会输出:
text in scope2
text in parent scope of scope2
use_scope() 还可以作为装饰器来使用:
from datetime import datetime

@use_scope('time', clear=True)
def show_time():
    put_text(datetime.now())
第一次调用 show_time 时,将会创建 time 输出域并在其中输出当前时间,之后每次调用 show_time() ,输出域都会被新的内容覆盖。
Scope支持嵌套。会话开始时,PyWebIO应用只有一个 ROOT scope。你可以在一个scope中创建新的scope。比如,以下代码将会创建3个scope:
with use_scope('A'):
    put_text('Text in scope A')

    with use_scope('B'):
        put_text('Text in scope B')

with use_scope('C'):
    put_text('Text in scope C')
以上代码将会产生如下Scope布局:
┌─ROOT────────────────────┐
│                         │
│ ┌─A───────────────────┐ │
│ │ Text in scope A     │ │
│ │ ┌─B───────────────┐ │ │
│ │ │ Text in scope B │ │ │
│ │ └─────────────────┘ │ │
│ └─────────────────────┘ │
│                         │
│ ┌─C───────────────────┐ │
│ │ Text in scope C     │ │
│ └─────────────────────┘ │
└─────────────────────────┘
put_scope()
我们已经知道scope实际上是输出内容的容器,那么我们能否将scope作为输出的子元素呢(比如将scope作为表格的一个cell),答案是肯定的。你可以使用 put_scope() 来显式创建一个scope,而从它以 put_ 开头的函数名可以看出,它也可以被传递到任何可以接受 put_xxx() 调用的地方。
put_table([
    ['Name', 'Hobbies'],
    ['Tom', put_scope('hobby', content=put_text('Coding'))]  # hobby is initialized to coding
])

with use_scope('hobby', clear=True):
    put_text('Movie')  # hobby is reset to Movie

# append Music, Drama to hobby
with use_scope('hobby'):
    put_text('Music')
    put_text('Drama')

# insert the Coding into the top of the hobby
put_markdown('**Coding**', scope='hobby', position=0)
小心
It is not allowed to have two scopes with the same name in the application.
输出域控制函数
除了 use_scope() 和 put_scope() , PyWebIO还提供了以下scope控制函数:
clear(scope): 清除scope的内容remove(scope): 移除scopescroll_to(scope): 将页面滚动到scope处
另外,所有的输出函数还支持使用 scope 参数来指定输出的目的scope,也可使用 position 参数来指定在目标scope中输出的位置。更多信息参见 output 模块 。
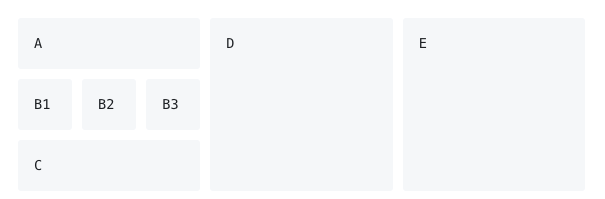
布局
通常,使用上述输出函数足以完成大部分输出,但是这些输出之间全都是竖直排列的。如果想创建更复杂的布局,需要使用布局函数。
pywebio.output 模块提供了3个布局函数,通过对他们进行组合可以完成各种复杂的布局:
put_row(): 使用行布局输出内容. 内容在水平方向上排列put_column(): 使用列布局输出内容. 内容在竖直方向上排列put_grid(): 使用网格布局输出内容
通过组合 put_row() 和 put_column() 可以实现灵活布局:
put_row([
    put_column([
        put_code('A'),
        put_row([
            put_code('B1'), None,  # None represents the space between the output
            put_code('B2'), None,
            put_code('B3'),
        ]),
        put_code('C'),
    ]), None,
    put_code('D'), None,
    put_code('E')
])
以上代码将在浏览器上显示如下:
布局函数还支持自定义各部分的尺寸:
put_row([put_image(…), put_image(…)], size='40% 60%') # 左右两图宽度比2:3
更多布局函数的用法及代码示例请查阅 布局函数文档 .
样式
如果你熟悉 CSS样式 ,你还可以在输出函数后调用 style() 方法给输出设定自定义样式。
可以给单个的 put_xxx() 输出设定CSS样式,也可以配合组合输出使用:
put_text('hello').style('color: red; font-size: 20px')

# in combined output
put_row([
    put_text('hello').style('color: red'),
    put_markdown('markdown')
]).style('margin-top: 20px')
style() 方法的返回值为对象本身,所以可以继续用于组合输出中。
Run application
在PyWebIO中,有两种方式用来运行PyWebIO应用:作为脚本运行和使用 pywebio.start_server() 或 pywebio.platform.path_deploy() 来作为Web服务运行。
Overview
Server模式
在Server模式下,PyWebIO会启动一个Web服务来持续性地提供服务。当用户访问服务地址时,PyWebIO会开启一个新会话并运行PyWebIO应用。
将PyWebIO应用部署为web服务的最常用方式是使用 start_server()
from pywebio import *

def main():  # PyWebIO application function
    name = input.input("what's your name")
    output.put_text("hello", name)

start_server(main, port=8080, debug=True)
现在,在 http://127.0.0.1:8080/ 页面就会看到欢迎页面了。
使用 debug=True 来开启debug模式,这时server会在检测到代码发生更改后进行重启。
start_server() 提供了对远程访问的支持,当开启远程访问后(通过在 start_server() 中传入 remote_access=True 开启 ),你将会得到一个用于访问当前应用的临时的公网访问地址,其他任何人都可以使用此地址访问你的应用。远程接入可以很方便地将应用临时分享给其他人。
将PyWebIO应用部署为web服务的另一种方式是使用 path_deploy() 。path_deploy() 可以从一个目录中部署PyWebIO应用,只需要在该目录下的python文件中定义PyWebIO应用,就可以通过URL中的路径来访问这些应用了。
注意
注意,在Server模式下, pywebio.input 、 pywebio.output 和 pywebio.session 模块内的函数仅能在任务函数上下文中进行调用。比如如下调用是 不被允许的
import pywebio
from pywebio.input import input

port = input('Input port number:')   # ❌ error
pywebio.start_server(my_task_func, port=int(port))
Script模式
如果你在代码中没有调用 start_server() 或 path_deploy() 函数,那么你就是以脚本模式在运行PyWebIO应用。
在脚本模式中,当首次运行到对PyWebIO交互函数的调用时,会自动打开浏览器的一个页面,后续的PyWebIO交互都会在这个页面上进行。当脚本运行结束,这个页面也将不再有效。
如果用户在脚本结束运行之前关闭了浏览器,那么之后会话内对于PyWebIO交互函数的调用将会引发一个 SessionException 异常。
并发
PyWebIO 支持在多线程环境中使用。
Script模式
在 Script模式下,你可以自由地启动线程,并在其中调用PyWebIO的交互函数。当所有非 Daemon线程 运行结束后,脚本退出。
Server模式
Server模式下,如果需要在新创建的线程中使用PyWebIO的交互函数,需要手动调用 register_thread(thread) 对新进程进行注册(这样PyWebIO才能知道新创建的线程属于哪个会话)。如果新创建的线程中没有使用到PyWebIO的交互函数,则无需注册。没有使用 register_thread(thread) 注册的线程不受会话管理,其调用PyWebIO的交互函数将会产生 SessionNotFoundException 异常。
Server模式下多线程的使用示例:
def show_time():
    while True:
        with use_scope(name='time', clear=True):
            put_text(datetime.datetime.now())
            time.sleep(1)

def app():
    t = threading.Thread(target=show_time)
    register_thread(t)
    put_markdown('## Clock')
    t.start()  # run `show_time()` in background

    # ❌ this thread will cause `SessionNotFoundException`
    threading.Thread(target=show_time).start()

    put_text('Background task started.')


start_server(app, port=8080, debug=True)
会话的结束
当用户关闭浏览器页面时,与之相应的会话也将被关闭。会话关闭后,应用中未返回的PyWebIO输入函数的调用将会抛出 SessionClosedException 异常,后续对PyWebIO交互函数的调用将会引发 SessionNotFoundException 或 SessionClosedException 异常。
大部分情况下,你不需要捕获这些异常,让这些异常来终止代码的执行通常是比较合适的。
可以使用 pywebio.session.defer_call(func) 来设置会话结束时需要调用的函数。无论是因为用户主动关闭页面还是任务结束使得会话关闭,设置的函数都会被执行。defer_call(func) 可以用于资源清理等工作。在会话中可以多次调用 defer_call() ,会话结束后将会顺序执行设置的函数。
More about PyWebIO
目前为止,你已经了解了PyWebIO中最重要的特性,并且可以开始编写PyWebIO应用了。然而,有些功能前面我们并没有覆盖到,这里提供了对剩余特性的一些简短介绍,如果你在应用编写过程中需要用到这里的某个特性,你可以查阅对应的详细文档。
另外,你可以在 cookbook 页面找到一些对于编写PyWebIO应用很有帮助的代码片段。
session 模块
pywebio.session 模块提供了对会话的更多控制 。
pin 模块
你已经知道,PyWebIO的输入函数是阻塞式的,并且输入表单会在成功提交后消失。在某些时候,你可能想要输入表单一直显示并可以持续性接收用户输入,这时你可以使用 pywebio.pin 模块。
platform 模块
pywebio.platform 模块提供了将PyWebIO应用以多种方式部署的支持。
PyWebIO的服务端与浏览器可以通过两种协议(WebSocket 和 HTTP 协议)进行通信,默认使用WebSocket协议,如果你想使用HTTP协议,你可以选择本模块中的其他 start_server() 函数。
如果要为PyWebIO应用设置一些网页相关的配置,可以尝试使用 pywebio.config() 。
高级特性
可以将PyWebIO应用整合到现存的Python Web项目中,PyWebIO应用和web项目使用一个web框架。详细信息参见 Advanced Topic: Integration with Web Framework 。
PyWebIO还支持基于协程的会话。具体参见 Advanced Topic: Coroutine-based session 。
如果你想要将PyWebIO应用打包到一个单独的可执行文件里面,从而使用户可以在没有安装python解释器的情况下运行应用,你可以参考 Build stand-alone App
如果你想在PyWebIO应用中进行一些数据可视化,可以参考 Data visualization
Last but not least
以上基本就是PyWebIO的全部功能了,你可以继续阅读接下来的文档,或者立即开始PyWebIO应用的编写了。
最后再提供一条建议,当你在使用PyWebIO遇到设计上的问题时,可以问一下自己:如果在是在终端程序中我会怎么做?如果你已经有答案了,那么在PyWebIO中一样可以使用这样的方式完成。如果问题依然存在或者觉得解决方案不够好,你可以考虑使用 回调机制 或 pin 模块。
OK, Have fun with PyWebIO!